In this post, I’ll show how to add a product in ClickFunnels so you can start selling and making money with ClickFunnels.
We’ll be using Stripe integration for this tutorial, but if you can still follow the steps below even if you are using PayPal or Authorize.net.
I hope you have connected your Stripe account with ClickFunnels…
If you haven’t yet connected your Stripe account with ClickFunnels, you can follow this guide on how to integrate Stripe with ClickFunnels.
Let’s dive in:
Important Things To Know About Adding Products To ClickFunnels
Most new ClickFunnels users don’t know this, but there are actually different kinds of pages.
The first thing you have to know is that if your page is selling a product or taking credit card information, then it needs to be the right type of page.
And for you to add products to your funnel, your page needs to be a sales page.
Particularly, an order form page.
However, ClickFunnels only lets you use one payment gateway per order form, which means you can’t use PayPal and Stripe on the same order form.
Nevertheless, you can still find your way around this using CF Pro tools.
For this post, we’ll use a supplement funnel.
Let’s go ahead and add an order form page to our funnel if we haven’t done that yet:
How to Add An Order Form Page To ClickFunnels
Here’s how to do it, step by step:
- Login into your ClickFunnels.
- From your ClickFunnels dashboard, navigate to Click Funnels at the top black navigation menu and click on Funnels.
- Then, select the funnel you want to add a product to.
- Click on ADD NEW STEP.
- Hover over SALES and click on ORDER FORM.
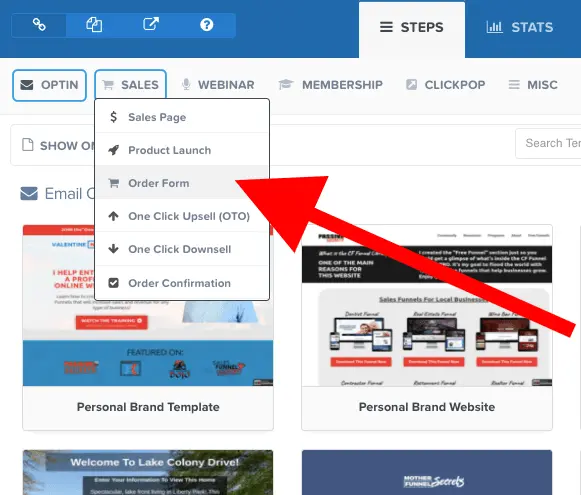
- Then, select a template of your choice.
After adding an order form page, let’s go ahead and start adding products to your funnel:
How To Add A Product In ClickFunnels
- Select the Order Form page and click on Products just under SETTINGS on the blue navigation menu.
- Then, click “Add Product.“
- Select “Stripe” from the integrations or click on Add Payment Integration to add a payment gateway to your account.
- Next, select “One-Time Product” as that’s what we’ll be creating in this tutorial.
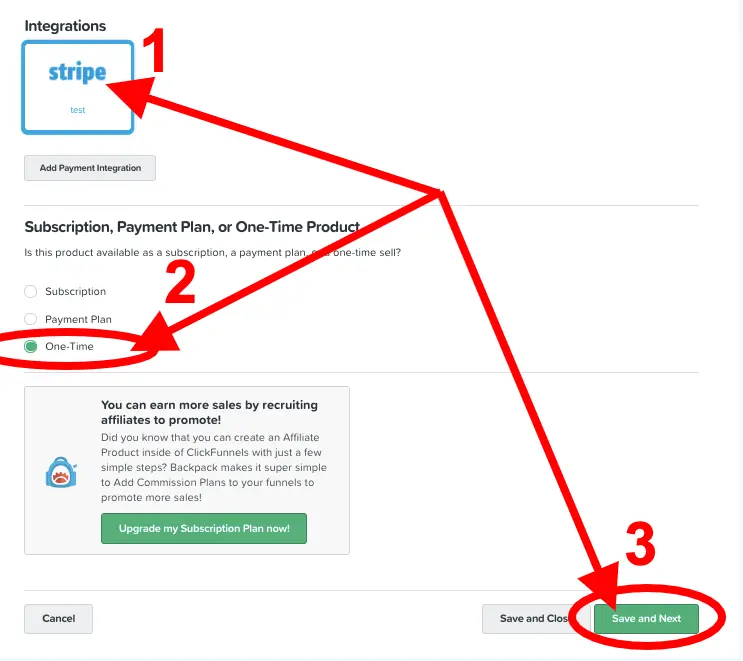
- If you are using the Backpack on the ClickFunnels platinum plan, you can go ahead and select a commission plan for your affiliates.
- Now, click “Save And Next.”
This will take you to the Product Details where you can fill in the details of your product.
Filling The Add Product Details Menu:
- Product Name: Provide a suitable name for your product.
- Product Price: Input the price of your product.
- Currency: Select which currency you want your payment gateway to accept.
- Price Display Override: customize and add some text to the price you want to show on your order form page. For example, you could say “One Time Payment of $997” or “$997 Only.” I hope that makes sense.
- Shipping Origin Address: If your product is a physical product, fill in where you ship your products from.
- Billing Description: Here, fill in the billing description that you want to appear on your customers’ card statements.
- Product Description: Here, you want to fill in the description that your customer will see of the product you are adding to your order form page.
- Bump Product: Here, you can toggle on or off if you want this to be a bump product. If you are creating an order bump, then leave this on. But, make sure it is not the first product you are adding to your order form page.
- Product Inventory Limit: Toggle on if you have a limited number of this product for sale, then set the Max inventory amount and/or Pre-sold Inventory amount.
- Then, click Save and Next.
This will take to the Product Variations tab where you can create different product variations.
You can watch this video below to learn all about product variations.
For this tutorial, we will leave product variations toggled off. Click Save and Next. This will take you to the Fulfillment Email Tab.
Fulfillment Email And Follow Up Actions
Here, you can set toggle this on so that ClickFunnels will send an automated email (thank you email) to your customer when they buy your product.
We would use the Follow Up emails instead. So, we are just going to leave this toggled off, then click on Save and Next.
This will take you to the FOLLOW UP ACTIONS tab.
Here, you can further customize the follow-up emails you want to send to your customers.
Here, click on the existing integration you want to use, then choose the list where you want the customer details sent.
If you are on the ClickFunnels platinum plan, you can use Follow Up funnels. But I use ActiveCampaign, and I highly recommend you do as well.
You can check out my ActiveCampaign pricing review here.
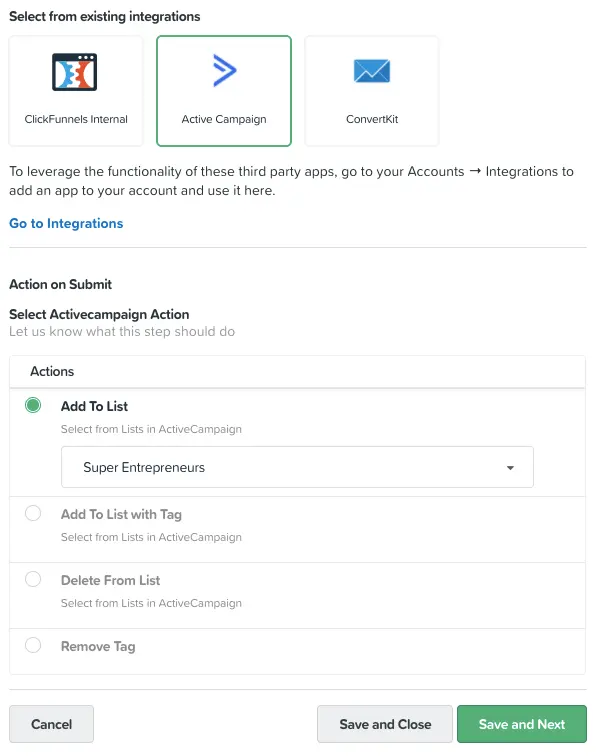
Then, click Save and Next.
Next, you can set if this product you are selling is a physical product. You want to leave this off if you don’t use any of the options provided by ClickFunnels.
Click on Save and Next.
That should take to the Product Summary page. Here, you can click on edit if you want to edit any of the details of your product.
And that’s it! Your product has been created. You can go ahead to add the product to your funnel using the page editor.
Conclusion On How To Add A Product In ClickFunnels
I hope you found this tutorial on how to add a product in ClickFunnels helpful.
Adding products to ClickFunnels will let you start selling your products and receiving payments with your ClickFunnels account.
ClickFunnels makes everything easy and fast for you, so you can shorten the amount of time it takes to get your products and services out to the marketplace.
ClickFunnels Bonuses
If you haven’t signed up for ClickFunnels yet, or you want to upgrade your ClickFunnels account to save up to $1,752.
Below is the list of bonuses that will help you achieve the success you want in your online business using ClickFunnels…
I will greatly appreciate it if you sign up or upgrade your ClickFunnels account through my link so I can give you access to the following:
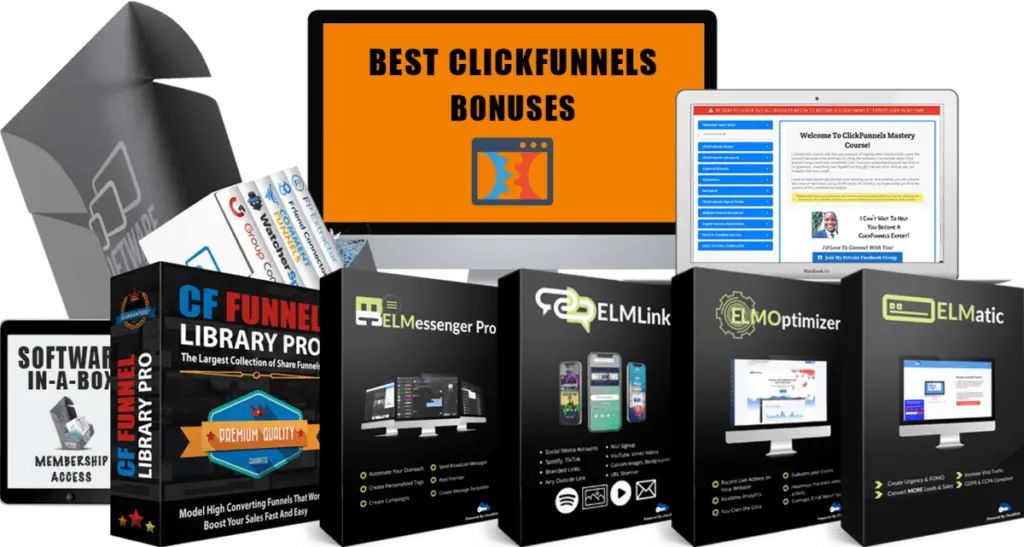
Here’s what you will get:
- Bonus #1: Lifetime Software-in-a-Box Membership Access: Get access to a bundle of useful, value-packed software products that you can give away as bonuses.
- Bonus #2: Lifetime Group Convert Silver Account: This is an amazing Facebook-based software that lets you build your email list with your Facebook group approval process so you can follow up with your leads and convert them into customers on autopilot.
- Bonus #3: Lifetime ELMessenger PRO Account Access: This is a Facebook marketing automation software that automates your organic Facebook marketing efforts so you can generate more high-quality leads and sales on autopilot.
- Bonus #4: Lifetime ELMOptimizer PRO Account Access: This is an all-in-one website analytics tool that helps you track your users’ journey, replay sessions, collect heatmaps & lots more.
- Bonus #5: Lifetime ELMLink PRO Account Access: This is a link tracking software that lets you shorten and track your affiliate links. It also lets you create personalized and easily customizable pages.
- Bonus #6: Lifetime ELMatic PRO Account Access: This is a web application that helps you show notifications on your funnels which can increase your conversions up to 100%.
- Bonus #7: ClickFunnels Mastery Course: A comprehensive free training program on how to use the ClickFunnels software to create beautiful sales funnels like a PRO (over 40 video lessons).
- Bonus #8: CF Share Funnel Library PRO + White Label Rights: A list of over 40 high converting ClickFunnels share funnels that you can import directly into your ClickFunnels account.
- Bonus #9: Ultimate List of Recurring Affiliate Programs + White Label Rights: A list of over 130+ high-ticket affiliate programs that you can promote to make lifetime recurring affiliate commissions.
- Bonus #10: Million Dollar Ad Swipe Library + White Label Rights: Get a compilation of the exact Facebook Ads of 40+ millionaire entrepreneurs.
- Bonus #11: Affiliate Launch Mastery Course + White Label Rights: Learn how to leverage affiliate launches and win affiliate contests.
- Bonus #12: OFA Challenge Mastery Course + White Label Rights: Learn a simple method that sold over 372 people into the One Funnel Away Challenge with zero ads spend, generating over $37,000 in commissions.
- Bonus #13: Mentorship With Unlimited Personal Chat/Email Support: I will guide and help you achieve the results you want with ClickFunnels (it can be confusing and overwhelming sometimes).
Each one of these bonuses will go a long way in helping you get the best results you want and definitely help you achieve success using ClickFunnels.
If you want more details and how to get these bonuses, check out my ClickFunnels bonus page.
| Tutorial: | How To Create A Product In ClickFunnels |
|---|---|
| Tool: | ClickFunnels |
| Trial: | Free 14 Days Trial |
| Price: | $97 to $297 per month |
| Discount: | HUGE 44% Off (Save $1,752) |
| Training: | One Funnel Away Challenge (See Bonuses) |
More ClickFunnels Tutorials
- Are there any ClickFunnels Black Friday & Cyber Monday Deals?
- ClickFunnels Lifetime Deal (2023): Is It Available For 2.0 or 1.0?
- What are the Best Sales Funnel Builders For Affiliate Marketing?
- What are the Best ClickFunnels Coaching Programs Available Online?
- What are the best ClickFunnels courses and training online?
- What is the Best Sale Funnel Builder and Software Platform?
- What are the best funnel building courses & training?
- What are the best Russell Brunson courses?
- Are there any ClickFunnels Discounts available?
- What is ClickFunnels Pricing and how much does it cost?
- What are the best ClickFunnels deals and bundle offer?
- Is ClickFunnels Annual Plan Worth The Upgrade?
- What Is Funnel Scripts Pricing?
- How do I Buy Funnel Scripts Without Watching The Webinar?
- Do You Have Funnel Scripts Bonuses?
- What are your One Funnel Away Challenge Bonuses?
- What are your Traffic Secrets bonuses?
- What Is The Funnel Hacking Secrets Bundle Offer?
- What Is The ClickFunnels 5 Day Lead Challenge?
- How Do I Get ClickFunnels Free For 6 Months?
- DotCom Secrets Review – Full Summary & Diagrams
- How To Add Godaddy Domain To ClickFunnels
- How To Integrate Calendly With ClickFunnels
- How To Use ClickFunnels Submit Form
- How To Embed A Youtube Video To ClickFunnels
- How To Remove The Made With ClickFunnels Affiliate Badge
- How To Change Favicon In ClickFunnels
- How To Save ClickFunnels Page And Section As Templates
- How To Duplicate A Funnel In ClickFunnels
- How To Delete And Restore Funnels And Pages In ClickFunnels

